Imagine leaving home and still having a secure tunnel back to your own network, no matter where you are, either on campus Wi-Fi, or a coffee shop, or abroad. That peace of mind is what you get when you turn your Raspberry Pi 5 into a VPN server. Today, let’s guide you through building your own VPN (without burning through your wallet) and show you insider tips that most tutorials skip. This isn’t just another raspberry pi project, it’s your personal firewall and encrypted gateway all wrapped in fire.

Why Build a Raspberry Pi VPN?
There’s fire in autonomy. Instead of relying on third-party VPN services that might log your data or throttle your speed, your Pi is fully in your control. Plus:
- Learn cybersecurity hands-on, its perfect for students exploring career paths.
- Control who accesses your home network, remotely connect to your files or camera, and avoid digital surveillance.
- Build a real-world DIY tech tool to impress.
In fact, diving into this project is a smart move alongside These Cybersecurity Secrets Every Campus Survivor Needs in 2025!, elevating both your toolkit and your resume.
What You’ll Need
Let’s make sure your foundation is solid:
- Raspberry Pi 5 (or Pi 4, but Pi 5 is recommended for speed).
- microSD card (32GB+) with Raspberry Pi OS Lite installed.
- Ethernet connection (strongly recommended) or stable Wi-Fi.
- Power adapter (official Pi PSU).
- Access to your router’s settings (for port forwarding).
- Basic Linux/terminal know-how.
First Steps: Prep the Pi
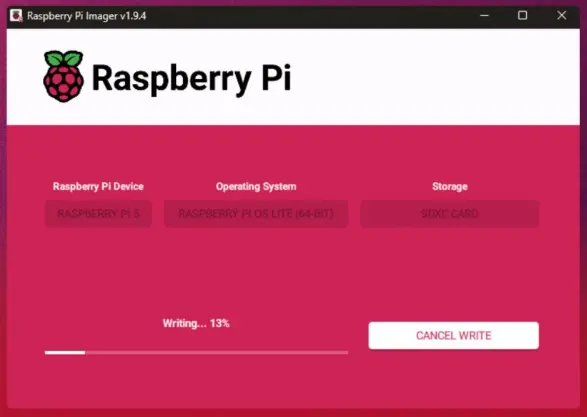
- Flash Raspberry Pi OS Lite, insert the microSD, and boot your Pi.
- Enable SSH by placing an empty
sshfile in the boot partition. - SSH in:
ssh pi@<pi-ip-address>- Immediately change the default password
(passwd).
- Run:
sudo apt update
sudo apt upgrade -y- Optional but recommended: disable SSH password login in
/etc/ssh/sshd_configto tighten security.
Give Your Pi a Permanent Address
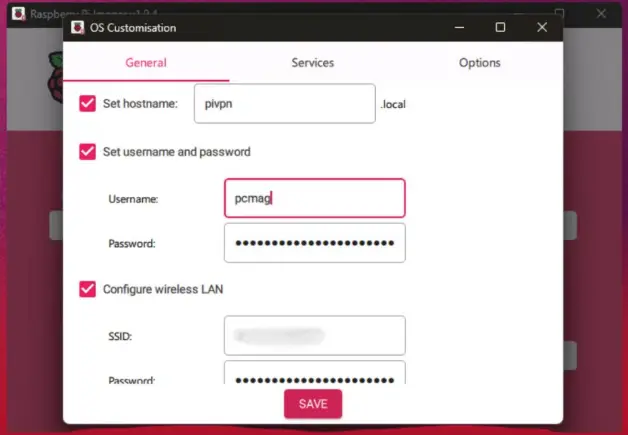
A static IP prevents your Pi from getting kicked off the network. SSH into your Pi, run hostname -I to find your current IP, then edit:
sudo nano /etc/dhcpcd.confAdd:
interface eth0
static ip_address=192.168.1.250/24
static routers=192.168.1.1
static domain_name_servers=1.1.1.1
Swap addresses to match your network. Save and reboot. This step keeps your VPN steady and reliable.
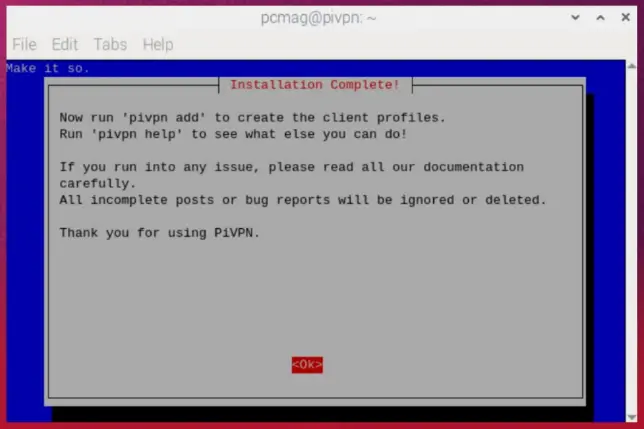
Install PiVPN – The Best Free Tool
Rather than wrestling with manual configs, PiVPN deploys everything you need with one command:
curl -L https://install.pivpn.io | bashFollow the prompts:
- Choose WireGuard (fast, modern, secure) or OpenVPN (broad compatibility). WireGuard is lightweight and almost always better for beginners.
- Confirm your static IP.
- Pick a port (51820 for WireGuard, 1194 UDP for OpenVPN).
- Choose DNS providers (Cloudflare, Google, etc.).
- Enable unattended upgrades and keeping your Pi secure is a long-term habit.
When it’s done, you’ve got a working VPN server ready for your devices.
Generate a Client Profile
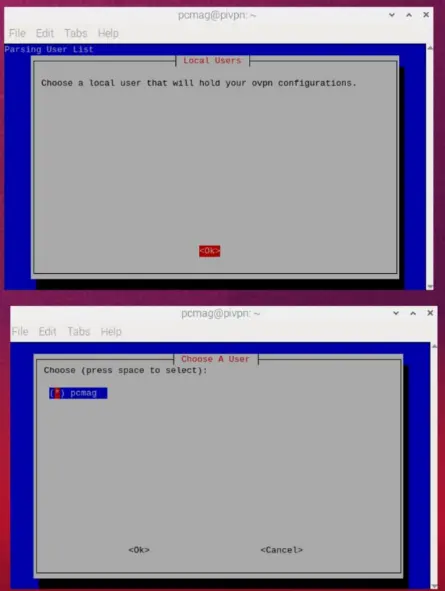
PiVPN uses simple commands to make client config files:
pivpn addName your device (e.g., “phone” or “laptop”). A .conf file is generated in your home directory and includes everything your device needs.
Secret Tip: For WireGuard, use pivpn -qr <name> and scan the QR code directly with your phone, no file hassle.
Router Setup: Port Forwarding
Your router must forward incoming VPN traffic to your Pi. Log into your router admin (often 192.168.1.1), and forward:
- Port 51820 UDP for WireGuard
or - Port 1194 UDP for OpenVPN
to the IP you assigned to your Pi. This step is non-negotiable, no forwarding, no outside access.
Connect from Your Device
- On your smartphone or desktop, install a VPN client, WireGuard or OpenVPN.
- Import the
.confor scan the QR. - Connect.
- Visit whatismyip.com. And if it shows your home IP address, congo you’re in. You’re now secure, even on sketchy public Wi-Fi.
What to Do (and What to Avoid)
Do:
- Automatically update your Pi system.
- Use strong, unique names for client profiles.
- Back up
/etc/wireguardor/etc/openvpnand store keys safely. - Think about dynamic DNS if your home IP changes frequently.
Avoid:
- Changing port numbers or protocols just for obscurity, well it rarely helps and often breaks things.
- Using weak passwords, it may cause you as keep in mind your Pi is publicly accessible.
- Forgetting to unblock ports in both router and Pi firewall.


Top Secret Tricks No One Mentions
- Home gateway mode: Let multiple devices connect to the Pi like a router, is a great if you want every device on your home VPN.
- Pi-hole and VPN combo: Route your DNS through Pi-hole on another Pi to block ads and trackers everywhere.
- Geo-spoofing firewall: Add scripts to ping IP ranges and block countries you never need to connect from.
Final Tips Before You Launch
- Test from different networks (mobile hotspot, cafés) to confirm connectivity.
- Label each profile clearly (“phone-main”, “tablet-travel”).
- Keep your Boot OS up to date, well security is only as good as your upkeep.
- Don’t fire up streaming servers or huge P2P tasks via VPN, they can choke your upload bandwidth.
Powering Up Your Resume
A project like this does more than secure your browsing. It shows recruiters you understand networking, Linux, encryption, and automation, key skills for junior sysadmin or DevOps roles.
Combine this with Top Backend Project Ideas: Perfect Picks for Portfolios & Resume. showing you can build full-stack apps and secure them end to end, that’s a compelling narrative. And if you’re building your cyber profile, don’t miss These Cybersecurity Secrets Every Campus Survivor Needs in 2025! to impress interviewers.
Conclusion: Your Own Secure Tunnel is a Few Steps Away
From a bare microSD card to a blazing VPN server, you’ve built something powerful and useful in order to protecting your traffic and proving your skills. The Raspberry Pi 5 makes it fun, affordable, and practical. Whether you choose WireGuard for performance or OpenVPN for compatibility, your private tunnel awaits.
Ready to launch? Gather your gear, follow these steps, and in under an hour you’ll have a working VPN server even impressing yourself. Let your friends know how tech-savvy you are and if you want more step-by-step guides or deeper security tips, dive into The Debug Club and check out thedebugclub.com for friendly, clever advice. You’ve got this.
Yes, models from Pi 3 onward work. But Pi 5’s faster CPU and Gigabit Ethernet give better performance and stability, hence ideal for make vpn server using raspberry pi 5 setups.
WireGuard is modern, fast, and lightweight and perfect for beginners. Use OpenVPN only if you need legacy device support. Both can be installed via PiVPN.
Yes, a static LAN IP on your Pi is essential. If your home IP changes, use free dynamic DNS (like DuckDNS) to access your VPN reliably.
After generating profiles with pivpn add, use pivpn -qr name to display a WireGuard client QR code. Scan it on your phone’s app, tap connect and you’re done.
Enable unattended upgrades, use strong passwords for clients, and back up the VPN keys. Regular updates are key don’t forget simple firewalls too.