If you’re tired of ads slowing down your devices or want to protect connected gadgets like smart TVs then setting up Pi-hole on Raspberry Pi 5 is a powerful solution. This hands‑on guide explains how to install Pi‑hole on Raspberry Pi, configure it, and block ads across your home network using practical steps and real screenshots. It’s one of the best Raspberry Pi project ideas you’ll find which is affordable, effective, and beginner‑friendly!
We’ll cover everything from initial setup to network configuration, DNS management, and ongoing maintenance. By the end you’ll have a working Raspberry Pi-hole ad blocker that secures all devices on your Wi‑Fi. Let’s dive in.

What Is Pi-hole and Why Use It?
Pi-hole turns your Raspberry Pi into a network-wide ad blocker by intercepting DNS requests. Instead of each device using its own ad blocker, your Pi acts as a central DNS server: when a device asks for ad domains, Pi-hole replies with a “no‑route” address and blocks the ad before it even loads.
This means ads on browsers, mobile apps, smart TV interfaces even IoT gadgets are blocked without installing anything on each device. It cleans internet experience, boosts privacy, and reduces bandwidth usage even on devices where you can’t install plugins. Want to explore other privacy hacks? Check out How to Make Your Own VPN Using Raspberry Pi 5 for remote secure browsing.
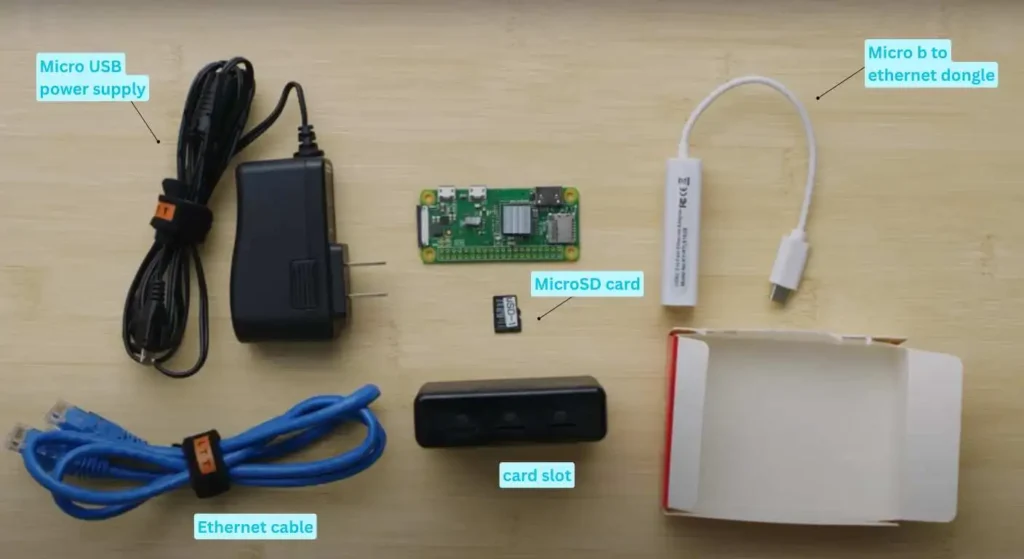
What You’ll Need
- Raspberry Pi 5 (or Pi 4) with Ethernet or reliable Wi-Fi connection
- MicroSD card (16 GB or larger) flashed with Raspberry Pi OS Lite (64‑bit recommended)
- Power supply, network access, and another computer for SSH setup
- Micro b to ethernet dongle.
- Optional: Ethernet cable for stable DNS performance
Pi-hole is lightweight and works with older Pi models too, but Pi 5 delivers top performance. Before installing, update your system:
sudo apt update
sudo apt full-upgrade -y
sudo reboot
Installing Pi-hole (Pi-hole Setup on Raspberry Pi)
To begin, run the official installer:
curl -sSL https://install.pi-hole.net | bashThis command will launch an interactive setup and choose options as follows:
- Set a static IP (via installer or your router’s DHCP reservation)
- Select wlan0 or eth0 (Wi‑Fi or Ethernet)
- Choose an upstream DNS provider (like Cloudflare or Google DNS)
- Enable default blocklists (including StevenBlack’s list)
- Install the web admin interface and lighttpd
- Opt for anonymous logging (or higher privacy mode)
When installation completes, you’ll see:
- the Pi’s IP address
- a link to access the admin dashboard (
http://<pi‑ip>/admin) - a randomly generated password (save it safely)
Accessing and Using the Web Dashboard
Open your browser and navigate to the address shown during install. Log in using the admin password. You’ll have access to:
- Dashboard: Total DNS queries, percent blocked, top domains
- Query Log: View requests, blocked domains, and clients
- Blocklists & Whitelists: Add or remove specific domains
- Client Groups: Apply customized filtering to devices
- Tools: Update blocklists (
pihole -g), reset admin password
The dashboard lets you add custom filters or whitelist favorite sites as needed. It’s user-friendly and gives you network-wide filtering power.
Configuring Your Network
To ensure every device uses Pi-hole:
- Router DNS Setup: Login to your router’s DNS settings (often under LAN or DHCP). Set your Pi’s static IP as the primary DNS server. Save and reboot devices.
- If DNS settings aren’t available, you can:
- Use Pi-hole as the DHCP server, or
- Manually set DNS on individual devices (smartphones, PCs). This method is less reliable but still effective for testing.
Once set, all DNS queries go through Pi-hole. You’ll notice fewer ads across apps, videos, and websites even on devices without browser blockers.


Troubleshooting Tips
- If ads persist: ensure clients are using Pi-hole DNS, disable DNS-over-HTTPS in browsers that bypass local DNS
- DNS resolution fails: ensure Pi-hole’s upstream DNS settings are correct and Pi has internet access (test with
ping 1.1.1.1) - To add fresh blocklists: visit “Adlists” page and click “Update Gravity” under Tools
- Reset the admin password via terminal:
pihole -a -p
You can combine Pi-hole with VPNs for mobile ad blocking at scale. For instance, use Pi-hole with your home VPN to block ads even when you’re away for this learn more from How to Make Your Own VPN Using Raspberry Pi 5.
Benefits & Best Practices
Why it matters:
- Blocks ads on ALL devices including consoles and IoT
- Speeds up web page loading and reduces bandwidth
- Stops trackers and privacy-harvesting third‑party domains
- Lightweight and runs on inexpensive hardware
Best practices:
- Use Ethernet for reliable DNS performance
- Keep the Pi-hole OS updated regularly
- Review dashboard logs occasionally
- Set specific filter policies for children’s devices or guest networks
Pi-hole also supports advanced networking setups if you’re interested in building Top Backend Project Ideas: Perfect Picks for Portfolios & Resume by creating your own ad-filtering or DNS tools.
Why This Project Rocks in Your Portfolio
This is an ideal hands-on project whether you’re a student or building a personal tech lab. Tackle open-source DNS filters, learn Linux basics, celebrate automation skills and you can reference this in a job-seeking context.
Pairing Raspberry Pi project ideas like this with security education whether exploring 10 Tech Skills That Guarantee High‑Paying Jobs Before You Graduate! This gives you broad appeal for roles in tech, IT, or DevOps.
Final Check: Summary Steps
- Flash Raspberry Pi OS Lite on your microSD
- SSH into the Pi, update and upgrade OS
- Install Pi-hole via
curl … | bash - Choose interface, set static IP, pick DNS upstream, enable blocklists
- Access admin dashboard, log in, tweak settings
- Point router (or devices) DNS to Pi-hole IP
- Add custom blacklists/whitelists
- Monitor queries; keep software updated
What to Avoid
- Avoid installing Pi-hole alongside heavy apps on the same Pi dedicate your Pi to Pi-hole if possible.
- Don’t skip logging; reviewing blocked domains helps you spot false positives or network issues.
- Never ignore DNS-over-HTTPS bypass, configure router or clients to prevent it overriding Pi-hole.
Ready to Start?
Grab your Raspberry Pi 5, microSD card, and follow the steps above. Within 30 minutes you’ll have a fully-functioning DNS ad blocker for your entire home. If you’re curious about automating VPN access or integrating Pi-hole into a more secure network environment, check out our guide on How to Make Your Own VPN Using Raspberry Pi 5.
Ad blocking at home is just the beginning but protecting your entire digital space is the next level. Start with Pi-hole, then explore layered strategies like 10 Preventive Cybersecurity Measures You Must Know in 2025 for complete coverage.
Pi‑hole acts as a DNS sinkhole to block ad domains across all devices on your network. When installed on Raspberry Pi (4 or 5), it handles ad blocking centrally, improving privacy, loading speeds, and bandwidth usage across smart TVs, phones, and more—without installing software on each device.
Flash Raspberry Pi OS Lite, SSH into the system, then run curl -sSL https://install.pi-hole.net | bash. Follow prompts to set static IP, choose DNS provider, and enable web admin. Access the dashboard via http://<pi-ip>/admin and log in using the generated password.
For full network coverage, update your router’s DHCP or DNS settings to point primary DNS to Pi‑hole’s static IP. If router config isn’t available, manually set DNS on device network settings. This directs DNS traffic from browsers, apps, and smart devices through Pi‑hole’s filters.
Running Pi‑hole on Raspberry Pi gives ad-free browsing, less data usage, faster page loads, fewer trackers, and centralized control. It works with everything from PCs to smart TVs, and it’s ideal for students or small offices seeking Raspberry Pi-hole ad blocker performance with minimal hardware.
Yes—you can combine Pi‑hole with VPNs (network clients), parental control filters, custom blocklists, or analytics tools. For example, you might secure remote browsing using your own VPN using Raspberry Pi 5, or tie Pi‑hole into broader protection ideas.