Getting started with a Raspberry Pi 4 is exciting – it’s a tiny but powerful computer that millions of people around the world use for fun and learning. By 2025, over 68 million Raspberry Pi boards have been sold worldwid, making it one of the most popular single-board computers ever. This step-by-step Raspberry Pi 4 setup tutorial will guide you through everything: from unboxing and connecting the hardware (power, keyboard, display, etc.) to installing the operating system and performing the first boot. No matter your experience level, you’ll learn exactly how to set up your Pi 4, install Raspberry Pi OS, and do the initial configuration. Think of your new Pi like a small desktop PC – you need a power supply, a “hard drive” (microSD card), and a monitor plus keyboard/mouse to get going. We’ll explain each step in simple terms and in order, so you won’t get lost. (For some inspiration on cool things you can do once your Pi is up and running, check out Amazing Raspberry Pi Project Ideas of 2025 on our blog – it’s full of fun projects to try!)

Required Hardware
When you unbox a Raspberry Pi 4 (or buy one as a bare board), you’ll see just the small green circuit board itself. Most starter kits include the official accessories, but if you only have the board, here’s what you’ll need:
- Raspberry Pi 4 board: The main computer board. It has several USB ports, an Ethernet port, two micro-HDMI display ports, and a USB-C power port.
- MicroSD card: This is the “hard drive” of the Pi. It needs to be at least 8GB (we recommend 16GB or larger, Class 10) to hold the operating system and your files. If you have a kit, it may include a pre-loaded SD card; otherwise you’ll need to buy one and flash it yourself (see next section).
- Power supply: The Pi 4 uses a USB-C port for power. You must use a supply that can deliver 5 volts and 3 amps (about 15 watts). The official Raspberry Pi 4 power adapter does this. (Beware: most phone chargers aren’t strong enough – unless they have USB-C Power Delivery technology – to run a Pi 4) Using a weak power supply or cable can cause instability.
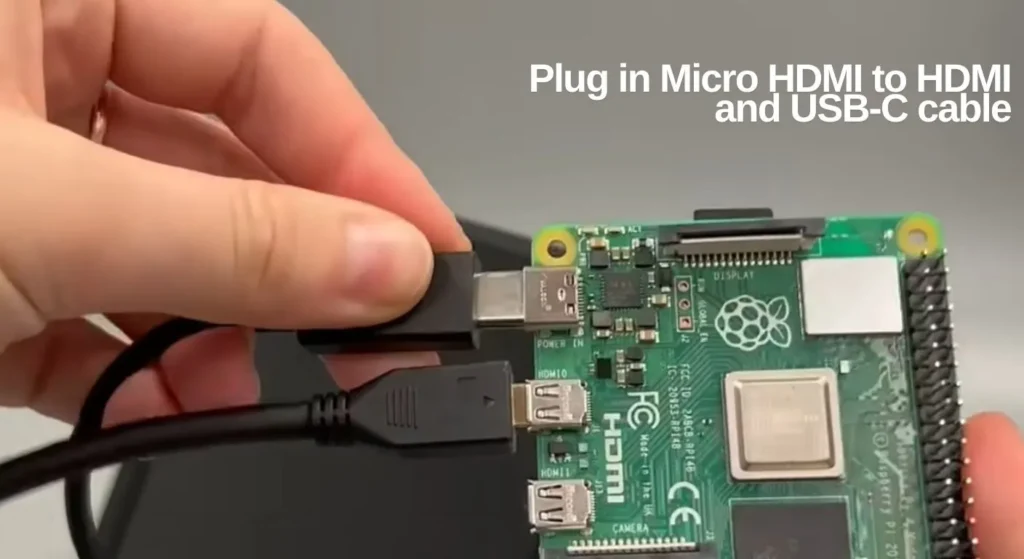
- HDMI cable: Unlike older models, the Pi 4 has two micro-HDMI ports, not the standard HDMI size. You’ll need a micro-HDMI to HDMI cable (or adapter) to connect it to a monitor or TV. Plug your main display into the port labeled HDMI0 (the one closest to the power jack) for bootup.
- Keyboard and mouse: Any USB (wired) keyboard and mouse will work. Plug them into the USB ports. (You can also use wireless USB adapters or Bluetooth, but a simple wired set is easiest to start.)
- Monitor or TV: A display with an HDMI input. If your TV/monitor only has standard HDMI, use the micro-HDMI cable mentioned above. If it has multiple inputs, make sure to select the correct HDMI input on your screen.
- Ethernet cable or Wi-Fi: The Pi 4 has built-in Wi-Fi and Bluetooth, but you can plug in an Ethernet cable to your router for a wired network if you prefer. (No cable is needed if you plan to use Wi-Fi.)
- Case (optional): A plastic or aluminum case isn’t strictly required, but it helps protect the board. A case with built-in heatsinks can help keep the Pi 4 cool, since this model tends to run hotter than older Pis
Make sure your power supply plugs into the port marked “POWER” (USB-C), not into one of the USB ports. Some Pi 4 units have a USB-C bug (in 2019 models) that can cause problems with certain cables, so using the official cable is safest. Once everything is connected, your Pi’s red LED will light up when power is on
Preparing the microSD Card (Installing the OS)
The Raspberry Pi 4 has no internal storage, so it boots the operating system from the microSD card you insert. We will install Raspberry Pi OS (formerly called Raspbian), which is the foundation’s recommended operating system. To do this, you’ll use a separate computer (Windows, macOS, or Linux) and a microSD card reader.
- Download Raspberry Pi Imager: The easiest way is to use the official Raspberry Pi Imager tool. Download it from raspberrypi.org and install it on your PC or Mac. The Imager will both download the latest Raspberry Pi OS for you and write it to the SD card.
- Insert the microSD card: Connect your SD card (via a USB card reader if needed) to the computer running the Imager.
- Run the Imager: Launch Raspberry Pi Imager, then click Choose OS and select Raspberry Pi OS (32-bit) from the list (this is recommended for most users). You can also choose the “Lite” version (no desktop) if you only want command-line use, or other OSes, but 32-bit Raspberry Pi OS is the safe default.
- Select the storage: Click Choose Storage and select the microSD card you inserted.
- Write the image: Click the WRITE button. The Imager will download the OS image and flash it to the card. This may take a few minutes. When it’s done, the SD card will contain the bootable Raspberry Pi OS.
- Eject the card: Safely eject or unmount the microSD card from your computer. Now it’s ready to go into the Pi.
Optional advanced step: If you want to enable SSH access or set the Wi-Fi network ahead of time (for a headless setup without a monitor), you can click the gear icon (settings) in the Imager and enter your hostname, Wi-Fi SSID/password, and even a username/password. This pre-configures the Pi for remote access. Otherwise, we’ll do Wi-Fi setup on first boot.
Connecting Peripherals and First Power-On
Now you have the board and the SD card with the OS. It’s time to assemble and turn it on. Always power off your Pi before plugging in or removing cards.
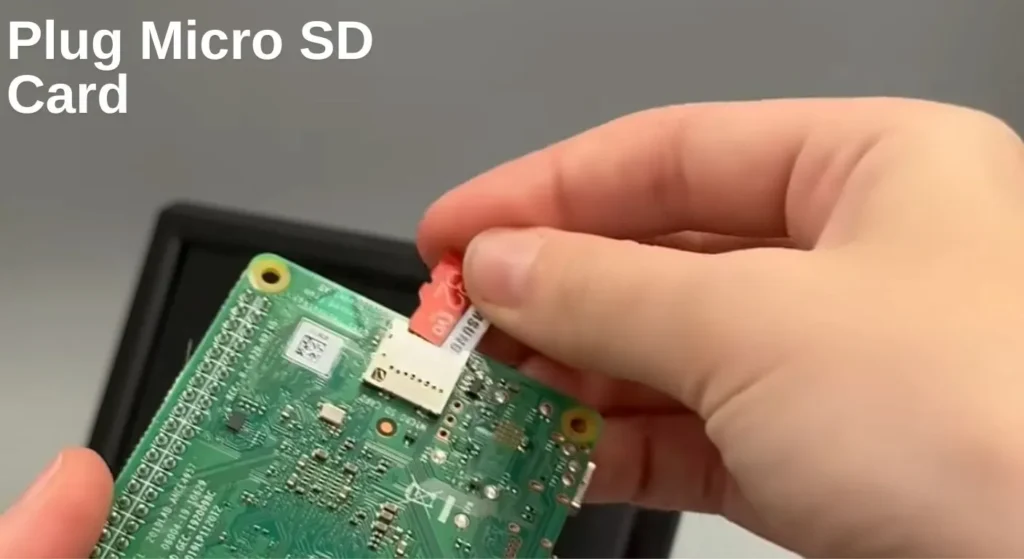
- Insert the microSD card: Locate the microSD slot on the Pi 4 (along one edge of the board) and insert the flashed SD card. It should click into place.
- Connect monitor: Plug your HDMI cable into the Pi’s HDMI0 port and into your monitor or TV. (On the Pi 4, HDMI0 is the left/bottom micro-HDMI connector.) Turn on the monitor.
- Plug in keyboard and mouse: Connect them to any of the USB ports on the Pi (even the black USB2.0 ports will work for normal input).
- Optional – Ethernet cable: If you have a wired network, plug an Ethernet cable into the Pi’s Ethernet jack. If not, you will use Wi-Fi during setup.
- Power it up: Now plug the USB-C power supply into the Pi’s power port and into the wall. There is no power switch; as soon as you plug it in, the Pi turns on. A red power LED on the board should light up. Within a few seconds, the green ACT LED will start flashing as the Pi boots.
If nothing appears on the screen after a moment, wait a minute for the first boot to finish, then press any key or click the mouse. If you still see no display, check the cable connection and make sure the SD card is fully inserted (the Pi will only boot if the card has a valid OS image).
Tip: If the screen shows the Raspberry Pi desktop or boot text, congratulations – your hardware connections are working!
For instance, you could turn your Pi into a network-wide ad blocker by installing Pi-hole – see our guide How to Install Pi-hole on Raspberry Pi for the full steps.
Initial Setup
The first time you power on, Raspberry Pi OS will guide you through basic setup. On versions of Raspberry Pi OS with a desktop (the default), you will see a setup wizard on the screen:
- Language and region: Choose your country, language, and time zone.
- New password: The system will ask you to set a password for the default user. Choose a strong password! The old practice of leaving “raspberry” as the password is strongly discouraged. (In fact, current Raspbian now forces you to create a new password at first boot, which is a welcome security improvement.)
- Wi-Fi (if not using Ethernet): The wizard will list available wireless networks. Enter your Wi-Fi SSID and password to connect to your network. (If you enabled Wi-Fi in the Imager, this may already be set.)
- System update: If the Pi is connected to the internet, Raspberry Pi OS will automatically download and install any available updates right now. This ensures you have the latest security fixes and software. Let it finish (it might ask to reboot).
Once the wizard finishes, you should be at the desktop screen (with a menu bar at the top).
Now open a Terminal window (the icon with a computer) or press Ctrl+Alt+T. It’s a good idea to manually update the system one more time to ensure everything is current. In the terminal, run
sudo apt update
sudo apt full-upgrade
This will check for any new package updates and install them. When it’s done, you may be prompted to reboot (type sudo reboot or use the Start menu to reboot).
Make your Pi a private VPN server for secure browsing – check out How to Make Your Own VPN Using Raspberry Pi 5 to see how it’s done (the process is similar on Pi 4).
Getting Familiar with Your Pi
- Desktop and Menu: When the Pi boots now, you’ll see a desktop with a terminal icon and a menu (with the Raspberry Pi logo). You can open the menu to find programs or configuration tools.
- Changing the password (if you skipped wizard): If for some reason the first-boot wizard didn’t prompt for a password, set one now by typing
passwdin the terminal and following the prompts. Never leave the default “pi/raspberry” login. - Enabling interfaces: If you plan to use special hardware (like a camera, GPIO, or certain sensors), run
sudo raspi-configin the terminal. Under Interface Options you can enable I²C, SPI, camera, SSH, and other interfaces. For example, to allow SSH access later, make sure SSH is enabled. - SSH (optional): If you want to control the Pi from another computer, you can SSH into it. In the terminal, type
ifconfigorhostname -Ito find its IP address on the network. Then from your laptop/PC, usessh pi@<IP address>(replace pi with your username and <IP address> with the one shown). You will then log in via command line. (If you enabled SSH in Imager orraspi-config, it’s already on.)


Tips and Best Practices
- Use a quality microSD card: Cheap or very old cards can wear out. A good Class 10 card (16–32GB) ensures reliable performance.
- Shutdown properly: Always shut down the Pi before unplugging power. Click the Raspberry menu → Shutdown, or use
sudo shutdown -h now. Unplugging without shutdown can corrupt the SD card. - Keep it cool: The Pi 4 can run hot, especially under heavy load. The starter kits often include a heat sink. If your Pi feels very warm, consider using a case with cooling or a small fan. (A bit of warmth is normal, but don’t ignore overheating.)
- Update regularly: Run
sudo apt update && sudo apt full-upgradeevery once in a while to keep software up to date. The Pi’s Debian-based system is actively maintained. - Security: Since your Pi will be on a network, keep security in mind. Don’t use default usernames/passwords. If you enable remote access (SSH, VNC), use strong credentials and consider changing the default hostname. For more advice on staying safe with your device, see our guide 7 Cybersecurity Secrets Every Campus Survivor Needs in 2025.
- Backup: As you make projects or store data on your Pi, consider backing up important files, since SD cards can fail eventually.
- Explore: Now that you’re set up, try the pre-installed applications (like the web browser or Python IDE). The
/home/pifolder is where your files go. You can create a file in the terminal by typingnano myfile.txt, for example.
What Next?
Congratulations – your Raspberry Pi 4 is now fully set up and running! At this point, it’s just like any other computer. You can install programs via the Terminal (using sudo apt install <package>), explore programming with Python, or dive into electronics and robotics using the GPIO pins.
This tutorial focused on getting your Pi operational. Once you’re comfortable, there are countless projects to explore. If you’re into software development, our Top Backend Project Ideas has great ideas on how to use your Pi as a web or database server.
Feel free to browse our blog for more Raspberry Pi articles and follow-up projects. With your Pi 4 set up, the sky’s the limit – experiment, tinker, and most importantly, have fun!
FAQs
If the green ACT LED doesn’t blink, your Pi can’t read the card. This is commonly due to a corrupted or improperly flashed microSD. Re‑flash using the official Imager, use a Class 10 card, and reinsert firmly.
This often means the power supply or USB‑C cable isn’t delivering enough voltage. Use the official 5 V, 3 A PSU and a compatible cable. Faulty cables or low voltage cause crashes or missing display output.
Some monitors or adapters won’t send EDID data, so the Pi fails to output video. Try connecting via the HDMI0 port (closest to power), use a high‑quality micro‑HDMI cable, or force config in config.txt.
If only one USB‑2.0 port fails, it may be a hardware contact issue. Forum users fixed this by gently pressing on the connector or using a thin shim under the plug—other USB ports often still work fine.
Probably due to overheating or unstable power. Pi 4 runs hot under load—especially in enclosed cases. Use passive heatsinks or fans, keep voltage steady, and avoid poor-quality power adapters to prevent crashes.