The dream of a personalized voice assistant, one that truly understands your commands and responds in a voice of your choosing, is now within reach. This guide will walk you through creating your very own DIY Raspberry Pi Assistant, transforming a compact Raspberry Pi into a custom companion. This project is more than just building a gadget; it’s an opportunity to gain hands-on experience and a deeper understanding of the technology that powers modern digital interactions, contributing to the development of valuable Tech Skills That Guarantee High-Paying Jobs Before You Graduate.
Gathering the Necessary Components
Hardware Components Checklist
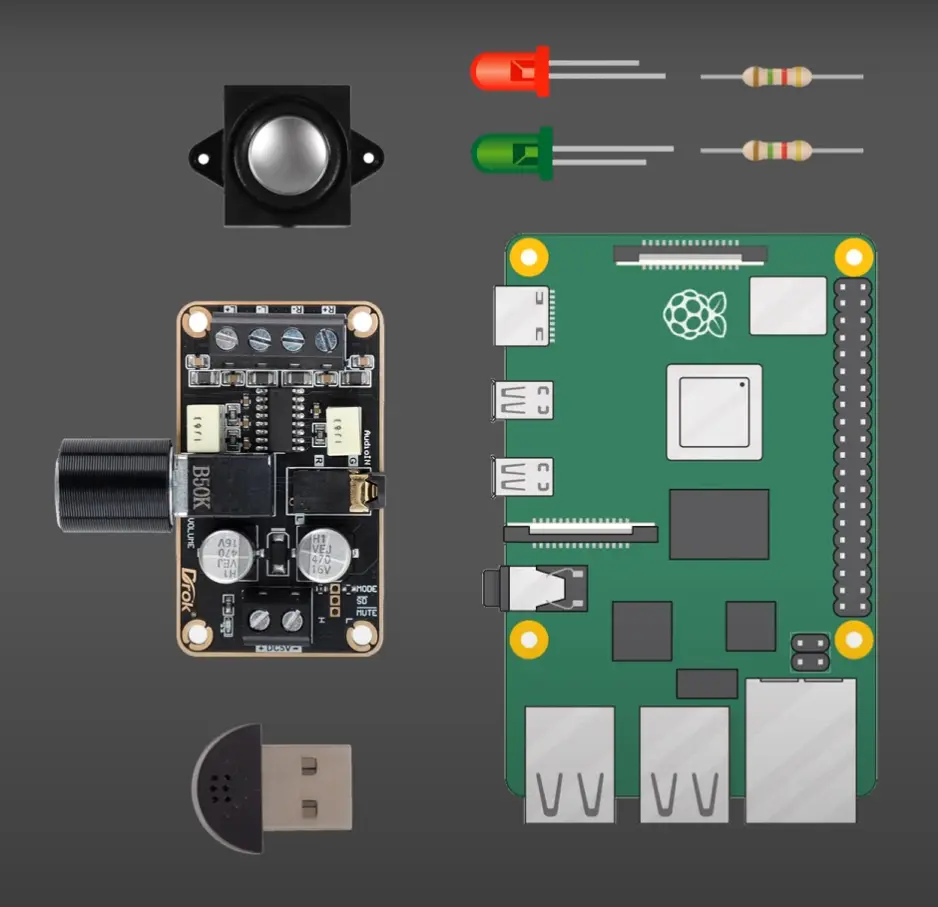
The physical components form the foundation of the voice assistant, providing its structure and enabling its interactions with the physical world.
- Raspberry Pi 4: This compact computer serves as the primary processing unit for the assistant. Any memory configuration of the Raspberry Pi 4 is suitable for this project.
- Micro SD Card: A minimum of 8GB is required to house the operating system and project files.
- 3D Printed Parts: These include one top case, one bottom case, and two speaker retainers, which provide the physical enclosure and a polished appearance for the assistant.
- Mini Speaker: This component provides the auditory output for the assistant’s responses.
- 3W I2S Audio Amp (MAX98357A): This small amplifier boosts the audio signal to the speaker, ensuring clear sound.
- 100K Ohm Resistor: A small but critical component for the proper functioning of the audio circuit.
- Double-sided Tape or Hot Glue: These adhesives are used to secure the amplifier within the case.
- Mini USB Microphone: This device enables the assistant to receive voice commands. The quality of the microphone directly impacts the clarity of audio input and the accuracy of speech recognition, with dedicated USB microphones generally offering superior performance compared to analog alternatives.
- 7 Dupont Wires: Each wire should be approximately 120-150mm long, with one end featuring a female connector for the Pi’s GPIO pins and the other end stripped for soldering.
- 4 Screws: M2.5 screws, either 28mm or 20mm with a spacer, are used for securing the case.
- 4 Nuts: M2.5 nuts are used in conjunction with the screws for case assembly.
- 2 Small Screws: These are specifically for securing the speaker retainers.
Software Essentials
Beyond the physical hardware, the assistant requires a digital infrastructure and a voice, which are facilitated by specific software components and crucial Application Programming Interface (API) keys.
- Operating System: Raspberry Pi OS (Bullseye – Legacy version) is the recommended operating system, available in full or lite versions. This specific version is vital for compatibility with the project’s Python scripts and libraries, as using a different, newer version could lead to significant and challenging debugging issues related to software dependencies.
- Key Python Libraries: The project necessitates the installation of Python Package Manager (PIP), Adafruit Blinka, PulseAudio, SpeechRecognition, OpenAI, and Azure Cognitive Services Speech Python libraries. These libraries form the foundational programming blocks that enable the assistant to process audio input, interpret language, and generate spoken responses.
- The
chat.pyProgram: This Python program, provided as part of the guide, constitutes the core logic that orchestrates the assistant’s operations. - API Keys for Intelligence: The core intelligence of the assistant relies on external cloud services.
- OpenAI API Key: This key is essential for accessing the powerful language capabilities. While a paid service, its cost for personal use is typically inexpensive.
- Microsoft Azure Speech Services Key and Region: These credentials are required for transforming text into natural-sounding speech. A free tier is available for this service.
It’s crucial to understand that while the hardware is local, the assistant’s advanced language understanding and speech synthesis rely on external cloud services, requiring consistent internet connectivity. This distinguishes it from a fully self-contained “Raspberry Pi voice assistant offline” solution. Effective API key management is paramount for functionality and security; incorrect, expired, or compromised keys will render the assistant unusable. Adding these keys to the /etc/environment file is a fundamental best practice for securing sensitive information, keeping it separate from the main program code. This approach aligns with broader
Preventive Cybersecurity Measures You Must Know in 2025 , emphasizing secure credential management in any DIY technology project.
Why Create a Personalized Voice Assistant?
While commercial voice assistants offer convenience, building your own provides unparalleled customization, enhanced privacy, and significant skill development. This project transforms you into a technology architect, fostering a deeper connection with your creation. Beyond the satisfaction of a tangible outcome, it’s an excellent entry point into the diverse world of electronics and programming. A self-built solution also addresses growing concerns about data privacy and user autonomy, offering greater control over personal information. This aligns with a broader trend towards increased user control over digital privacy and network security, similar to how you might Install Pi Hole on Raspberry Pi to filter unwanted content at a network level, or
Make your own VPN using Raspberry Pi to secure online traffic and access home networks remotely. The versatility of the Raspberry Pi extends far beyond this single application, enabling users to explore other practical applications such as how to Turn Raspberry Pi into Motion Detecting Home Security Camera , showcasing its potential as a foundational learning platform for more complex and rewarding endeavors.
Before embarking on the assembly process, it is essential to ensure all required components are readily available. This meticulous preparation streamlines the building process, contributing to a smoother and more enjoyable experience.
Assembling the Assistant: The Physical Build
With all components gathered, the next phase involves physically connecting the hardware elements, akin to solving a practical puzzle.
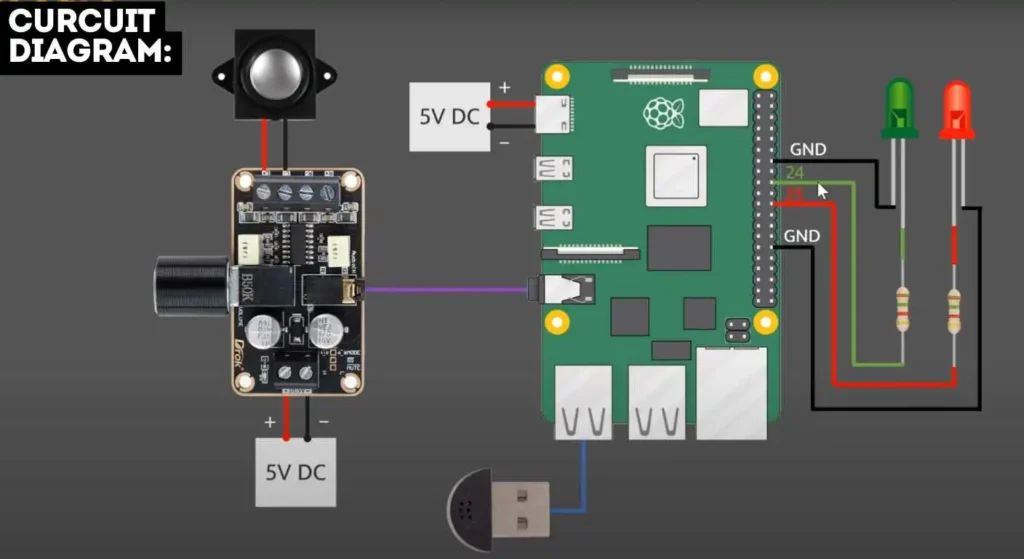
Step-by-Step Wiring and Case Assembly
Careful attention to detail during wiring is crucial for optimal performance, particularly concerning audio output.
- Prepare Wires: Prepare seven Dupont wires, each approximately 120-150mm long. Ensure one end has a female connector suitable for the Raspberry Pi’s GPIO pins, and the other end is stripped of insulation for soldering.
- Solder Connections: Meticulously solder the stripped ends of the wires to the MAX98357A audio amplifier and the push-button switch according to the following scheme :
- Yellow wire from BCLK on amp to GPIO 18
- Green wire from LRC on amp to GPIO 19
- Blue wire from DIN on amp to GPIO 21
- Red 1 wire from Vin on amp to 3.3v on Pi
- Black 1 wire from GND on amp to Ground on Pi
- Red 2 wire from one side of the switch to GPIO 16
- Black 2 wire from the other side of the switch to Ground on Pi
- Speaker Wires: Solder the two speaker wires to the positive (+) and negative (-) solder points located at the top of the amplifier board.
- Mount the Pi: After attaching the wired components, carefully position the Raspberry Pi into the bottom section of the 3D-printed case.
- Connect Microphone: Plug the USB microphone into any available USB port on the Raspberry Pi.
- Secure the Case: Secure the top section of the case to the bottom using M2.5 screws (either 28mm or 20mm with a spacer). Alternatively, the two halves can be simply pushed together for a snug fit, reinforcing the hands-on and adaptable nature of this Raspberry Pi ChatGPT robot project. The integration of a physical push-button switch for interaction further enhances the tangible feel of the device, providing a satisfying physical interface for the user.
Troubleshooting Tip: Common Audio Amplifier Issues (Crackling, Popping)
Issues with audio output are common and often stem from the physical connections or power supply.
- Excessive Crackling: Often attributed to “excessive ringing on the LRC and/or BCLK lines.” Adding low-value resistors (10 to 50 ohms) to these lines can help.
- Pop Sound Between Plays: Can occur if the BCLK signal isn’t present before the LRC signal begins. Momentarily muting the amplifier using the SD Mode line or sending silence during pauses can mitigate this.
- Audio Breaking Up/Crackling at High Levels: Typically indicates a power supply issue. Ensure a stable and sufficient power supply. Shorter wires or adding capacitance at the breakout board might also improve performance.
Bringing It to Life: Software Setup on the Raspberry Pi
With the hardware assembled, the next critical phase involves installing the operating system and essential software, which imbues the assistant with its digital capabilities. This stage marks the true commencement of the assistant’s functionality.
Preparing the Pi: Installing the Right Operating System
The selection and configuration of the operating system are foundational steps for the project’s success.
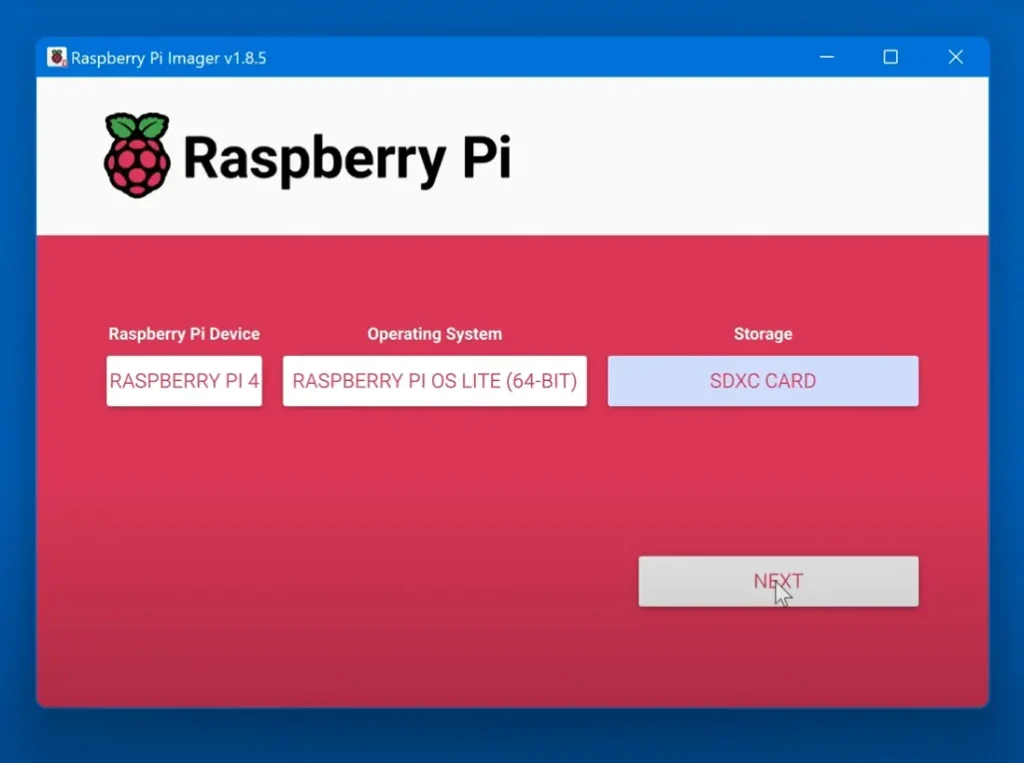
- Choosing the OS: Use Raspberry Pi Imager to install Raspberry Pi OS (Bullseye – Legacy version). This specific version is paramount for compatibility with Python scripts, preventing debugging challenges.
- Imager Settings: Configure network parameters (home network name, password, username, computer name) via the “Settings” gear icon during installation.
- SSH Access: After OS installation, SSH into the Pi from your PC/Mac using
ssh user_name@computer_name.localfor remote control. SSH is disabled by default in newer OS versions and requires manual activation (blanksshfile on boot partition for headless, orsudo raspi-configin GUI). - Hotspot Configuration: For mobile operation, add your phone’s hotspot SSID and password to the
wpa_supplicantfile on the Pi usingsudo nano /etc/wpa_supplicant/wpa_supplicant.conf.
Troubleshooting Tip: SD Card and Boot Problems
Issues preventing the Raspberry Pi from booting are frequently related to the SD card or power supply.
- Pi Not Booting (No Video/LED Activity): Most common cause is the SD card. Use a high-quality (8GB+ ) and correctly imaged SD card. The ACT (green) LED provides diagnostic feedback: if it doesn’t blink rapidly for at least twenty seconds, the Pi cannot read the SD card. A regular four-blink pattern indicates inability to locate
bootcode (start.elf). The red power LED should be constantly lit; if it extinguishes or blinks, the power supply is inadequate.
Troubleshooting Tip: Connecting via SSH
Remote connection issues via SSH are common, especially after re-imaging the Pi.
- “WARNING: REMOTE HOST IDENTIFICATION HAS CHANGED!” Error: Delete the contents of the
known_hostsfile on the connecting PC/Mac. - SSH Not Working After Fresh Install: SSH is disabled by default in recent Raspberry Pi OS versions. For headless setups, place a blank
sshfile on the boot partition before first boot. In GUI setups, enable viasudo raspi-config. - Host Key Problems: If messages concerning host keys (
/etc/ssh/ssh_host_*) appear, regenerate them withsudo rm /etc/ssh/ssh_host*followed bysudo dpkg-reconfigure openssh-server, then restart SSH or reboot.
Setting Up the Python Environment
This phase involves installing the essential tools and libraries that form the software backbone of the assistant’s program.
- Update and Install PIP: Execute the following commands in the Pi’s terminal:
sudo apt install python3-pyaudio build-essential libssl-dev libasound2 wget
sudo apt update
sudo apt upgrade # (press q to quit if alerted)
sudo apt-get install python3-pip
sudo apt install --upgrade python3-setuptools- Install Adafruit Blinka: This library provides Python support for GPIO, crucial for hardware interaction:
sudo pip3 install adafruit-python-shell
wget https://raw.githubusercontent.com/adafruit/Raspberry-Pi-Installer-Scripts/master/raspi-blinka.py
sudo python3 raspi-blinka.py- Confirm reboot with ‘Y’.
- Install PulseAudio: This sound server manages audio input/output:
sudo apt install libpulse-dev pulseaudio apulse- Verify daemon status with
pulseaudio --check -v; start withpulseaudio --startif needed.
Integrating Speech Services: Recognition and Synthesis Libraries
These libraries empower the assistant to comprehend spoken commands and articulate responses verbally.
- Install Speech Recognition, OpenAI & Azure Speech Services Libraries: Install necessary Python libraries for speech-to-text, language model interaction, and text-to-speech:
pip3 install SpeechRecognition
pip3 install --upgrade openai
pip3 install --upgrade azure-cognitiveservices-speech- This project strategically combines powerful cloud services (OpenAI for language models, Azure Speech Services for text-to-speech) with open-source tools (
SpeechRecognition,Adafruit Blinka,PulseAudio) for local hardware interaction, enabling sophisticated projects without building every component from scratch.
Troubleshooting Tip: USB Microphone Setup
Common issues with USB microphones often relate to detection, configuration, or volume.
- Microphone Not Detected/Working: Confirm detection with
lsusb. If not listed, it might be faulty or lack drivers. Usearecord -lto identify “card number” and “device number” for the microphone. Set as default recording device by creating/modifying.asoundrcin/home/pi/. Test recording witharecordand playback withaplay. Adjust volume withalsamixer.


Securing the Assistant’s “Voice”: Managing API Keys
Access to powerful online services necessitates the use of API keys, which serve as digital credentials for the assistant’s cognitive and vocal capabilities.
- Register with OpenAI and Microsoft Azure Speech Services: Obtain API keys from OpenAI and Azure Speech Services for language model and text-to-speech access.
- Add Keys to Environment File: For security, add API keys and region to
/etc/environmenton the Raspberry Pi usingsudo nano environment. This prevents sensitive credentials from being embedded in code, a critical security measure
OPENAI_API_KEY="YOUR_OPENAI_API_KEY_HERE"
SPEECH_KEY="YOUR_AZURE_SPEECH_KEY_HERE"
SPEECH_REGION="eastus" # (or your chosen region)- Enable Audio with Adafruit Blinka (I2S DAC): Configure the audio amplifier with the Raspberry Pi:
pip3 install --upgrade adafruit_blinka
curl -sS https://raw.githubusercontent.com/adafruit/Raspberry-Pi-Installer-Scripts/master/i2samp.sh | bash- Confirm with ‘y’ to continue, ‘n’ to activate in background, and ‘y’ to reboot.
Troubleshooting Tip: API Key Authentication Errors
API key management can be complex, and various errors can arise beyond simple key presence.
- General API Key Issues (OpenAI & Azure): Verify the API key is correct, active, and associated with the appropriate service. Check for typos, extra spaces , or expired/revoked keys. Review permissions and usage limits, especially for free plans. Clear locally cached old keys.
- “WebSocket upgrade failed: Authentication error (401)” (Azure): Often indicates an invalid Azure Speech Key. Edit
chat.pyto ensurespeech_keyand region are correct. - Network/Connection Issues: API errors can stem from network problems like timeouts or connection failures. Check internet stability, proxy configuration, SSL certificates, or firewall rules.
Personalizing the Assistant: The chat.py Program
The chat.py program represents the core logic that orchestrates the assistant’s behavior, allowing for the definition of its unique personality and voice.
Copying and Customizing the Assistant’s Personality and Greeting
The ability to customize the assistant’s personality is a pivotal feature, transforming the project beyond a mere technical exercise into a truly engaging and personalized interaction.
- Transfer
chat.py: Copychat.pyfrom your PC/Mac to the Raspberry Pi’s/home/pidirectory usingscp chat.py pi@raspberrypi.local:/home/pi. - Customize Personality: Modify the
SYSTEM_ROLEparameter inchat.pyto define the assistant’s attitude (e.g., “angry boss,” “sweet elementary school teacher”). This implicitly introduces prompt engineering, a vital skill in AI.
SYSTEM_ROLE = (
  "You are a helpful voice assistant in the form of a sweet kindergarten teacher"
  " that answers questions and gives information"
)- Set the Greeting: Customize the assistant’s initial greeting within the
mainroutine ofchat.py
chat.speak(
  "Hello! My name is Lilly and I'm you personal assistant. You can ask me anything. Just press the red button whenever you would like to talk to me"
)- Run the Program: Test the assistant by executing
python3 chat.pyin the Pi’s terminal.
Making the Assistant Autostart
For the assistant to function as a permanent fixture, it is beneficial to configure it to start automatically upon the Raspberry Pi’s boot-up.
- Create a Service File: Create a service file using
sudo nano /lib/systemd/system/chat.service. - Add Content to the Service File: Add the following content to the service file to automatically launch the assistant after network connectivity:
[Unit]
Description=ChatGPT assistant
Wants=network-online.target
After=network-online.target
After=multi-user.target

Type=simple
User=pi
WorkingDirectory=/home/pi
ExecStartPre=/bin/sh -c 'until ping -c1 google.com; do sleep 1; done;'
ExecStart=/usr/bin/python3 /home/pi/chat.py
[Install]
WantedBy=multi-user.target- Save and close (CTRL-X, ‘y’, Enter). Reload systemd with
sudo systemctl daemon-reload. Test withsystemctl start chat.service. Enable autostart withsudo systemctl enable chat.servicefollowed bysudo reboot. To stop the program when run as a service, find the process ID (PID) withtop | grep python3and terminate withkill -9 <PID>.
Conclusion
Building a personalized voice assistant with a Raspberry Pi is a significant DIY technology achievement. It yields a highly customizable device and offers an invaluable educational journey, cultivating practical skills in hardware integration, OS configuration, Python programming, and API interaction. Customizing the assistant’s personality and managing its cloud-based intelligence introduces fundamental concepts in shaping AI behavior. This project highlights the power of combining local hardware with cloud services, offering a robust and adaptable solution. The emphasis on secure API key management and troubleshooting prepares builders for common tech challenges. This endeavor showcases the Raspberry Pi’s versatility and the empowering nature of DIY electronics, serving as a gateway to further exploration in areas such as Backend Project Ideas and other innovative applications. The skills cultivated are increasingly relevant in a technology-driven world, providing a solid foundation for future technical pursuits.
Ensure the mic is recognized by Pi OS using arecord -l, set it as default (alsamixer), and test with arecord & aplay. If issues persist, try a USB hub or alternate mic and verify power supply stability, especially on Pi 4/5 setups
Yes! A Raspberry Pi Zero camera project or Pi Zero voice build can support assistant scripts using lightweight Python libraries. With internet access, a mic, and speaker, Pi Zero can host a simplified Raspberry Pi voice assistant offline-style setup for voice Q&A.
Low accuracy often stems from background noise, incorrect mic gain, or cloud STT limitations. Use alsamixer to adjust gain, record in quiet settings, or use Whisper or Vosk offline speech recognition for better results on Pi 5+
This can happen if the API call fails or your program loops without proper error handling. Add try-except blocks to handle errors gracefully, log each command using debug prints, and restart the script when timeouts occur.
Sometimes TTS disables the mic. You may need to manually toggle mic active status or avoid speech overlap. Using button control or whisper resets helps. Delay subsequent recordings until after TTS playback finishes.
Yes, unstable power supplies or corrupted SD cards are common causes of Pi crashes. Use quality 5V 3A USB‑C power and a reliable microSD card. Check voltage under load or test with a USB power meter to rule out power issues